A ukulele has four strings, when in the standard C tuning, these are G, C, E and A. Unlike a guitar, the strings are not in pitch order. String 4 (G, the one closest to your chin) is the second highest, string 3 (the C) is the lowest string and string 1 (A, furthest from your chin) is the highest. This is called reentrant tuning and can be found on many other instruments such as the Cittern and the South American Charango.
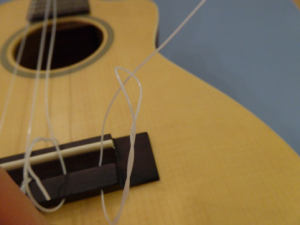
As can be seen in the photos below, there are two main ways of fixing the strings to the bridge of the ukulele. One uses a straight forward knot (left), the other, a ‘tie-bar’ uses a more complicated twist (right)
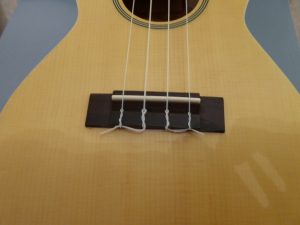
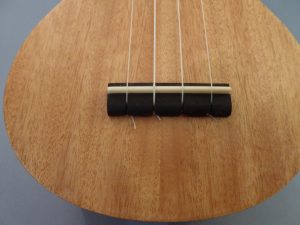
Once you’ve identified which type you have find the relevant section and instructions below.
I advise you re-string one string at a time. This means that you won’t get mixed up with which string goes where, and you will also have a guide as to what it should look like from the remaining strings. I start with the high A, then work to the left of each string, that way I can put the left over end beneath the bridge inside the next loop to make it look neat. Each string is a different thickness, so look carefully at the packet to identify which string is which – they’re often colour coded.
Removing old strings
Twist the tuning peg so that the string is de-tuned. If you’re not sure which way to go, pluck the string as you twist the peg and you should hear the pitch going down and the string will get slacker. Once it is loose, slide the string out of the tuning nut and then out from the bridge. If you have the simple know type, you should just be able to push the string out. If you have the tie-bar type, you will need to push the string through the knot until it becomes loose enough to remove.
Attaching new strings to the bridge
Simple Knot Style Attachment
If you have the version on the left it’s really easy. Tie a knot at the end of the string, feed the string into the slot and it will pull tight when you tune the string using the tuning pegs.
Tie Bar Style Attachment
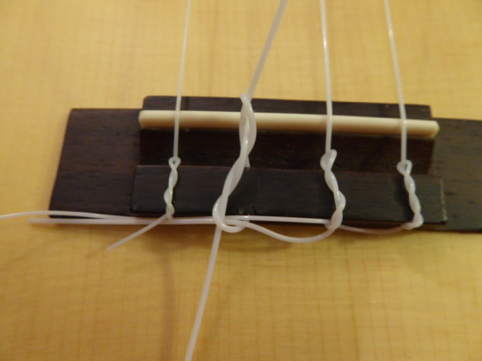
The type on the right with the looped knot is a little more complicated…
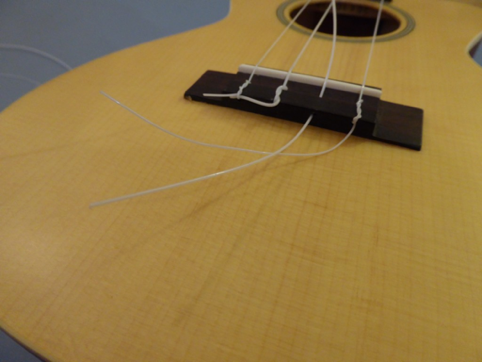
- Push the string through the hole so that you have about an inch or so poking out below the bridge (see picture below)
2. Take the end poking below the bridge and wrap behind the part of the string which will go up to the tuning nut (in other words the part of the string above the bridge)
3. Wrap the string around itself (the bit that crosses the bridge, not the bit that is going up to the nut) 2-3 times so you get a twist; you’ll only manage about twice for the low C string. Make sure you wrap it around the bit coming from the bottom of the bridge, not the top. See the pictures below.
Attaching the String to the Tuning Pegs
4. Turn the tuning peg so that the hole points across the uke (not up and down) and poke the string through from the inside to the outside, taking care it falls into the guide at the top of the neck
5. Wrap the string along the underside of the nut, the bit facing the bridge, then under the string and back over the top so you get a sort of V shape
6. Start to tighten the string by twisting the tuning peg, you may want to hold the string down close to the peg so that it starts to wrap from the bottom
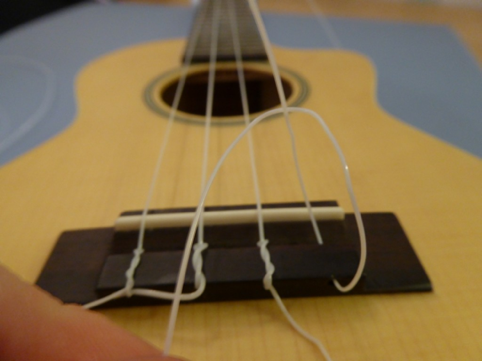
7. Tighten enough to put tension on the string, but not up to tune yet. As you do so, the loop at the bridge will start to move into place
The loop will pull into place as you tighten the string
8.You can put the previous strings left over end at the bridge inside the loop you create under the bridge to make it look neat. However, you’ll need to keep the strings a little looser as you go so that you can do this, tightening them up once you have it all finished.
9. Bring the strings up to pitch and tune them – see the ‘Tuning Your Ukulele’ page for more information on this
This will take quite a bit of work, don’t be surprised if you have to keep turning the pegs lots and lots! Eventually you will reach the correct pitch. To start of with you will need to retune regularly, but the more you play (and tune) the quicker the strings will settle and eventually you will need to retune very little, I usually leave the ends on the strings for a few days to wait until the strings have settled. After this, you can cut them down so they don’t get in the way.
10. Repeat with all strings